Studio Mysteries

October 8, 2009

Legs! 3-for-1 Leg Sale! Get Your Leg Here!

Filed under: Anatomy, Drawing, Rey Bustos — Tags: , , , , — Anya Galkina - Studio Mysteries @ 7:57 pm

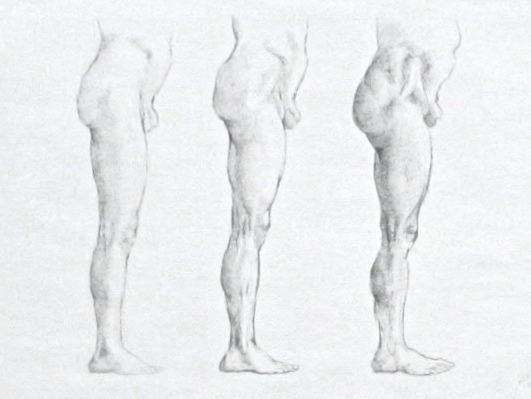
2009_analyticalDrawing_3legs This fabulous leg bonanza is an exercise we did in Rey Bustos’s Analytical Drawing. Rey has taken to calling me his groupie, and perhaps this accusation is somewhat grounded in reality. In the spring term, I took his 3D Anatomy/Ecorche class, in the summer I took his 2D Anatomy, and now I’m taking Analytical Drawing to top it all off. Not only that, but I elbowed my way into the Analytical class as one of only 3 part-time students, because this course is in the full-time program, and I had to whine fight to get in.

I am very happy I did, if only for this exercise alone. A lot of figure drawing teachers tend to teach a style (their own) and a shorthand for indicating anatomical information (also their own). Before I knew anything about anatomy, such a teaching approach was useful to me as a student, albeit in a limited way. I could put visual information into a drawing that helped the viewer recognize human features in it, even if I didn’t know what it was that I was putting in.

But once I learned all my fancy anatomy learnin’, the shorthand and styles of the teachers stopped working for me. Now on top of actual information about actual, real form, I was also memorizing arbitrary information and arbitrary ways to convey it. I found that when a teacher taught me to find anatomical goods myself, I could do it, but when they said, “here is a formula for a leg, just use it,” I couldn’t reconcile it with the actual leg in front of me or what I recognized in the leg and wanted to portray.

Another interesting problem I developed after learning anatomy has to do with style. Again, I used to have my own style of conveying what I see. But what I see is now different from what I used to see! That’s knowledge for you. It messes up your whole system of dealing with the world. Now my habitual stylistic flourishes don’t work anymore and I haven’t developed new ones yet.

This is where the triple-leg bonanza steps in. This exercise came after we spent several weeks learning the skeleton and muscle structure of legs, and did a bunch of ecorche drawings. Now, when the class sits down to draw from the model, everybody’s drawings tend to look like skinless people! The stylistic breakdown has occurred. We think about bone and muscle, about what’s inside the leg, so we draw that instead of the outer form. It’s a normal stage in the life of an artistic anatomy student. This exercise is designed to move us past that and to help us develop our own new way of drawing the leg – informed by what’s inside, and showing evidence of what’s inside, but actually depicting the visible, outside form. And doing so in a visual language that is uniquely ours, a recognizable individual style that arises out of an individual perception.

It’s very interesting how the Renaissance not only brought the individuality of the viewer into the picture, by using perspective and showing an image as seen from a specific vantage point, but also made it impossible for artists to be anything other than individuals in how they went about producing images. Once you learn anatomy, you can’t draw to a predetermined canon. You have to find a way to articulate what you see, because you can’t unsee it in favour of an externally imposed system. If you draw from anatomical knowledge, you are forced to develop your own pictorial language, and the hand that is visible in the drawings becomes as unique as fingerprints. That’s a huge difference from anonymous workshops making works that also look anonymous (like Egyptian frescoes, for example).

So back to the triple-leg threat: the exercise was to draw specifically a skin-possessing, normal-looking leg, and we had to do it from imagination rather than live model or reference. Because we drew from imagination, we had to rely on internalized information and cement that memory further. Because we drew a normal leg rather than an anatomical chart, we had to grapple with how to show anatomical information in a realistic drawing. But why the three legs, you say? Why, why, why? Well, that’s where we got to play with style. Leg #1 had to be a roughly normal leg. Leg #2 had to have the muscle articulation dialed up a bit, going from a mellow interpretation to someone more jazzy, like Raphael, who would emphasize musculature while still keeping the overall gist of the drawing relatively grounded. Leg #3 is in Michelangelo territory – a beef festival! You can see that my natural sensibility is somewhere between 1 and 2 – my heavy metal leg is not especially loud or bumpy. Some people created terrifying and magnificent bump landscapes with their Leg #3, and it was a lot of fun to look at them.

The exercise result is a boring and weird-looking drawing, but it’s a fantastic journey that trains some very important mental muscles. The idea of this exercise can be applied in other art exploration – take a material or a subject, and do a range of pieces that explore just how far you can push the technical aspect of something, or the intensity of a stylistic approach, going from subtle and quiet to roaringly insane. Or in my case, mildly louder than before.

September 13, 2009

Studio Mysteries Answers Questions

Filed under: 3D Anatomy Course, Anatomy, Ecorche — Tags: , — Anya Galkina - Studio Mysteries @ 1:48 pm

The purpose of this blog is in large part educational. Therefore, it cheers my little blogger heart to no end when I look at what search terms people used to get here, and see that some of them are in the form of a question. Here are some answers:

Q. “Is pubic bone below ilium?”

A. Yes. The ilium is the topmost bone in the pelvis. If you put your hands on your waist and move them down until they run into the pelvis, what you will touch is the ilium. Although it’s important to note that in anatomy, terms such as “above” and “below” are relative. The human body is capable of a great range of movement and often positions itself ass over teakettle. This means the artist has to analyze the relationships between major anatomical landmarks for every pose.

Q. “How to draw boobs”

A. How indeed. I suggest, “with lots of enthusiasm” and “by observing how they conform to the underlying form of the rib cage”. Breasts are glands protected by fatty tissue, resting on top of the pectoralis muscles in a bubble of skin. Female breasts have weight and drape over whatever they lie on top of. Kirk Shinmoto has a hilarious, though also crude and slightly awful analogy: think of balloons filled with water and nailed to a barrel.

Conversely, don’t draw breasts as though they are billiard balls. Even artificially augmented breasts are filled with material that is pliable, not rock solid. And solidity is what makes artificially augmented breasts look fake and weird. Breasts are soft. They are meant to be treated – and drawn – with care.

Q. “how rey’s anatomy do skeleton?”

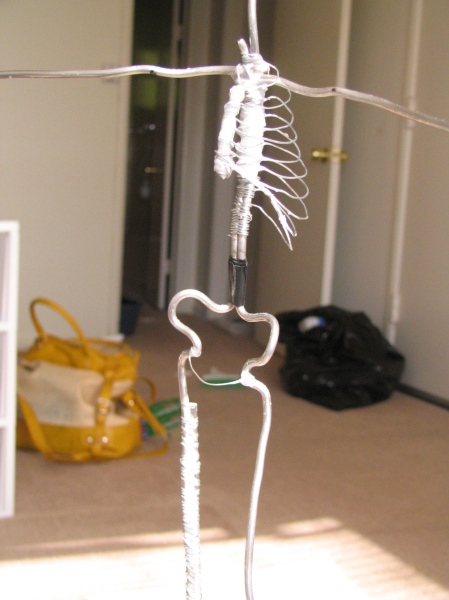
A. In the 3D Anatomy/Ecorche class, we started with constructing a wire armature that would support the weight of the clay and keep the ecorche upright. We sculpted the skeleton on top of that. Because half of the ecorche would be eventually covered with muscle, we made the skeleton on the exposed half very detailed, and on the muscle half, rougher and more general.

Rey stresses that studying the skeleton is the most important part of artistic anatomy. There are a couple of reasons for that.

First, muscles and fatty tissue are very changeable. They look different in every pose, and vary a lot from individual to individual. The skeleton is immutable and though individual variations exist, they are much more subtle.

Secondly, similarly to breasts, muscle and fat tissue drapes. In a way, it has no form of its own, like a dress that assumes its final form only when the wearer puts it on. If you understand the skeleton, you understand how the underlying bones give form to what you see on the surface.

Thirdly, muscles attach to bones. If you figure out where the bones are and what they are doing, all you have to do is connect the origin and insertion points with a tear-drop shape and presto – you have the muscles. (Every muscle has origin and insertion points – think of it as a bridge from point A to point B. When you study muscles, you have to study what points of the skeleton they connect).

August 31, 2009

Mapping The Land Of Golf Balls

Filed under: 2D Anatomy Course, Anatomy — Tags: , , — Anya Galkina - Studio Mysteries @ 5:49 am

It’s all very well to learn about bones and muscles from anatomy books, where everybody stands like a soldier at attention and conveniently has no skin. That is the first step in learning artistic anatomy – memorizing what’s where.

The second step is no less challenging, perhaps even more so. The second step involves looking at an actual human body, or even a representation of it in figurative art, and identifying what it is that you are looking at. To me, it feels like reciting the Bible backwards in a foreign language while doing a handstand. Just when you thought you got a handle on it, somebody takes it upon themselves to bend a limb and rotate it as if to mock every diagram ever drawn and labelled, and you have to discover America all over again while the native people point and laugh.

It’s week 8 of the 2D Anatomy course, and we are doing exercises that at first seemed competely impossible: taking a master drawing or sculpture, tracing its outline and drawing the muscles and bones within it. The first few assignments, I would look at a figure, and it would be covered with a myriad of completely random bumps, as if the model was wearing a pelt of golf balls. “Who are you, Random Bump # 317? I demand a valid identification!” I would shout, and the golf balls would dance and undulate as if to mock the very concept of sobriety.

Now it’s a bit better. I can look at the work of even the most beef-happy artist, like Michelangelo or Rodin, and identify at least a couple of bumps. And once you get a handle on a couple of bumps, you can get them to snitch on their neighbours! If bump X is an elbow, there are only so many possibilities as to what bumps Y and Z can possibly be. I correctly triangulated a scapula off a muscle the other day, and it was almost as much fun as ice-cream.

This is Rodin’s Thinker. His forearm is basically a sea creature family reunion, but hah! Science named them all. Score one for Team Darwin.

anatomy2D_week8homework_2

July 14, 2009

An Artist’s Working Day in the 21 Century

Filed under: Anatomy, Being a Professional Artist, Drawing — Anya Galkina - Studio Mysteries @ 12:41 am

I am sitting in a local Kinko’s, asking myself where I want to go today. Firenze? Paris? Warsaw? The Metropolitan? The Louvre? The Hermitage?

I am here to do homework. The homework entails an assignment where we take a masterwork portraying the human figure, and draw the skeleton hidden within that figure, on a sheet of tracing paper.

I lean back in my chair, close my eyes, and decide who I am going to learn from today. Will it be fiery Michelangelo, whose motor would not rest until he articulated every single muscle forming the surface of the figure, no matter how minor? Or will it be elegant Leonardo, with harmony permeating every stroke, every form, the details as beautiful as the whole? Or should I visit my other mentors, teachers, old friends, Rodin, Rembrandt, Rubens? Or am I ready to swallow the useful but unpleasant medicine of Ingres, to try and discern a skeleton under the chilly perfection of his smooth women?

How can anyone possibly make a choice like that, and how wonderful that I don’t have to. I stroll through WikiCommons, from era to era, from museum room to museum room, and visit them all – because museums never close in the age of the Internet, because the most brilliant and wise artists of humanity are just an arm’s reach away – because I can.

May 24, 2009

Norbert Grew Some

Filed under: 3D Anatomy Course, Anatomy, Ecorche, Rey Bustos — Anya Galkina - Studio Mysteries @ 5:32 pm

The 3D Anatomy/Ecorche course with Rey Bustos is more than half-way through, and we are finishing up the skeleton. Rey spends a lot more time on the bones than on the muscles. It makes sense because if you get the skeleton right, getting stuff to drape over it correctly is a breeze. But if the underlying structure is wrong, then the muscles hang off it wrongly too.

This course has been one of the most challenging classes I have ever taken, because it’s two steep learning curves for the price of one (unless you are a sculptor who is used to small-scale work). I have sweated many, many hours not only wrapping my head around complex anatomical information, but on top of that, trying to create a 3D version of my class notes in a material I have never worked with before.

I’d be lying if I said this project wasn’t overwhelming and frustrating at times – many times – but as I persisted and kept sweating through it, it has gotten easier and more rewarding. The human skeleton looks more and more beautiful to me. It is also becoming known, charted, even well-loved territory, whereas before, it was an alien and incomprehensible terrain.

As we go through the course, I realize how much we are just scratching the surface of what there is to know. I read somewhere that in gaining any new skill, you go through four stages:
1. Unconscious ignorance – when you don’t know just how much you don’t know.
2. Conscious ignorance – when you are crushed by the realization of how much you don’t know.
3. Conscious knowledge – when you begin to acquire mastery over the subject, and are tickled pink about it.
4. Unconscious (internalized) knowledge – when your knowledge informs what you do without you having to stop and think about it.

On a clear day, I can see Stage 3 from where I am. Far away, though.

Ecorche Norbert Is Getting Bigger and Stronger.

Ecorche Norbert Is Getting Bigger and Stronger.

May 4, 2009

Rey Bustos’ Propeller Pelvis

Filed under: Anatomy, Rey Bustos — Anya Galkina - Studio Mysteries @ 6:08 pm

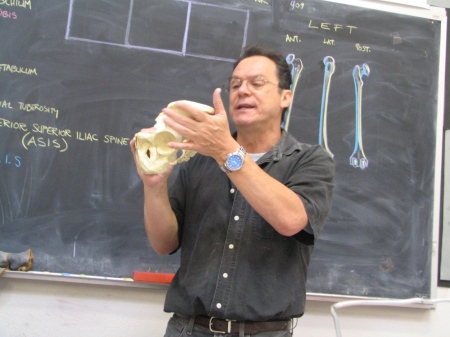
Did you know that the pelvis has a propeller structure? Bet you didn’t know that. Propeller structure, in engineering terms, means a plank that has been twisted, so that one part of it is at an angle to the other.

The bones of the pelvis are twisted just like that! The upper pelvic bones (the ilium), are at an angle to the lower pelvic bones (the pubis). Check it out:

2009_anatomy_pelvisdirection3

See the direction in which Rey’s fingers are pointing? That is the angle of the ilium planes.

2009_anatomy_pelvisdirection1

Now see the picture below – the pubic plane is a totally different direction:

2009_anatomy_pelvisdirection2

See? It’s a propeller plank!

This is why anatomy is impossible to learn purely from books. You need a teacher with a passion for the subject and a good sense of humour.

P.S. That is a very understanding pelvis, especially considering it used to belong to a dude. As Leonard Cohen says, we are so lightly here.

April 29, 2009

3D Anatomy With Rey Bustos: Ecorche, Wireframe Stage

Filed under: 3D Anatomy Course, Anatomy, Ecorche, LAAFA, Rey Bustos — Anya Galkina - Studio Mysteries @ 3:37 pm

One of the reasons I came to California and to LAAFA is the chance to study with Rey Bustos, a legendary anatomist and as I am discovering, an equally legendary and brilliant teacher. One of his teaching inventions is having the students construct their own sculptural ecorch̩ (skinless human form). The sheer effectiveness of this as a teaching tool is incredible Рyou learn through all your senses, not just the ones involved in listening, reading and taking notes. You also learn to think in space and 3-dimensionally, which is crucial for people who work in 2D as well.

One of my favourite Rey sayings so far is that when you look at powerful figurative artworks, you believe that there is a back to the front. That’s what makes them so effective – they are about the entirety of the form, whether parts of it are visible or not. They are driven by internalized knowledge of that form, so that the artist is free to add or edit, and is not a slave to what’s lit up vs. obscured, for example.

The ecorche-buiding process is great in that it dictates an inside-to-outside learning sequence: first we learn about a structure and then cement the learned material by making that structure.

This is the first stage, in which we build a wire support:

2009_anatomy_ecorche_wire1

Different thickness of wire is used for different parts of the support. We built the rib cage with individual wire ribs, after learning a bit about the rib cage. Here are some rib cage facts:

  • Humans come equipped with a default installation of 24 ribs, 12 on each side.
  • Ribs 1-7 are attached to the vertebral column in the back, and to the sternum in the front.
  • Ribs 8-10 are hangers on: the sternum runs out of room for attachments at Rib 7, so Ribs 8-10 have to form a daisy chain. Rib 8 attaches to Rib 7, Rib 9 attaches to Rib 8 and so on.
  • Rib 8 is the widest point of the rib cage. The ribs that follow begin to decrease in size.
  • Rib 10 is the last fully attached rib. It is also a major anatomical landmark that is visible on non-plus-size models. One of the things you need to do when constructing a drawing of a human figure is to look at the position of the 10th ribs, the tilt of the imaginary line connecting both of them, and how that tilt relates to the tilt of the shoulders and the pelvis.
  • Ribs 11 and 12 are much shorter and do not attach at the front. Their main function is to protect the kidneys, and I personally find them a little creepy.
  • The fully attached ribs, 1-10, have bone-to-bone joints at the back, but at the front, they are attached with cartilage. This cartilage expands and contracts as we breathe. How nifty is that?

Note that we are only constructing the wire support for the ribs on one side. That’s because this side will have exposed bone at the end. The other side will be built out of muscle, and the ribs will be covered anyway. Luckily, it’s not a big deal because human beings are conventiently symmetrical and if you understand half the rib cage, you are beginning to understand the whole.

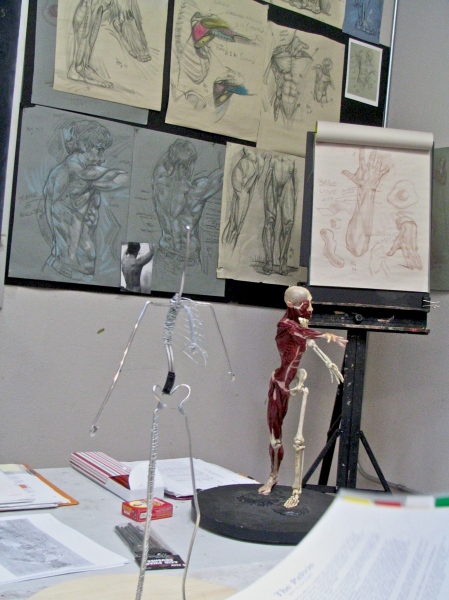
Incidentally, my ecorché is named Norbert. Eventually, Norbert will look like this other dude in the background:

2009_anatomy_ecorche_wire2

Naming the ecorche is a popular student sport. My classmate Amanda named hers Sven, and let me tell you: Sven works out.

Blog at WordPress.com.